


Install Zabbix on CentOS 8
This post explains how to install Zabbix on CentOS 8. Zabbix is an open-source software to monitor servers, network and cloud services.
You need to install Apache, PHP and MySQL in order to install Zabbix. Also, make sure that the SELinux is disabled on the server.
Install Apache in CentOS 8
Installing Apache in CentOS 8 is simple and straight forward.
dnf -y install @httpd
Once it is installed start the service and enable it to start at boot.
systemctl start httpd
systemctl enable httpd
Install PHP
We are installing PHP 7.2 and it’s required PHP extensions that are required for the Zabbix server.
dnf module -y install php:7.2
dnf -y install php php-pear php-cgi php-common php-mbstring php-snmp php-gd php-xml php-mysqlnd php-gettext php-bcmath php-json php-ldap
Once it is installed, enable and start the php-fpm service.
systemctl start php-fpm
systemctl enable php-fpm
Install MariaDB
MariaDB installation is also very simple as it is available on AppStream repository.
dnf -y module install mariadb
Enable and start MariaDB database server
systemctl mariadb enable
systemctl start mariadb
Then run the following command for MariaDB initial setup.
mysql_secure_installation
Example Output:
[root@zabbix ~]# mysql_secure_installation

NOTE: RUNNING ALL PARTS OF THIS SCRIPT IS RECOMMENDED FOR ALL MariaDB
SERVERS IN PRODUCTION USE! PLEASE READ EACH STEP CAREFULLY!

In order to log into MariaDB to secure it, we'll need the current
password for the root user. If you've just installed MariaDB, and
you haven't set the root password yet, the password will be blank,
so you should just press enter here.

Enter current password for root (enter for none):
OK, successfully used password, moving on...

Setting the root password ensures that nobody can log into the MariaDB
root user without the proper authorisation.

Set root password? [Y/n] y
New password:
Re-enter new password:
Password updated successfully!
Reloading privilege tables..
... Success!


By default, a MariaDB installation has an anonymous user, allowing anyone
to log into MariaDB without having to have a user account created for
them. This is intended only for testing, and to make the installation
go a bit smoother. You should remove them before moving into a
production environment.

Remove anonymous users? [Y/n] y
 ... Success!

Normally, root should only be allowed to connect from 'localhost'. This
ensures that someone cannot guess at the root password from the network.

Disallow root login remotely? [Y/n] y
... Success!

By default, MariaDB comes with a database named 'test' that anyone can
access. This is also intended only for testing, and should be removed
before moving into a production environment.

Remove test database and access to it? [Y/n] y
- Dropping test database...
... Success!
- Removing privileges on test database...
... Success!

Reloading the privilege tables will ensure that all changes made so far
will take effect immediately.

Reload privilege tables now? [Y/n] y
 ... Success!

Cleaning up...

All done! If you've completed all of the above steps, your MariaDB
installation should now be secure.

Thanks for using MariaDB!
[root@zabbix ~]#
Once it is done, we can go ahead and install Zabbix server
Install Zabbix Server
rpm -Uvh https://repo.zabbix.com/zabbix/4.0/rhel/8/x86_64/zabbix-release-4.0-2.el8.noarch.rpm
dnf clean all
dnf -y install zabbix-server-mysql zabbix-web-mysql zabbix-agent
Then create Database
Use the following commands:
# mysql -u root -p
password
mysql> create database grepit_zabbix character set utf8 collate utf8_bin;
mysql> grant all privileges on grepit_zabbix.* to user_zabbix@localhost identified by 'password';
mysql> quit;
Sample Output:
[root@zabbix ~]# mysql -u root -p
Enter password:
Welcome to the MariaDB monitor. Commands end with ; or \g.
Your MariaDB connection id is 19
Server version: 10.3.11-MariaDB MariaDB Server

Copyright (c) 2000, 2018, Oracle, MariaDB Corporation Ab and others.

Type 'help;' or '\h' for help. Type '\c' to clear the current input statement.

MariaDB [(none)]> create database grepit_zabbix character set utf8 collate utf8_bin;
Query OK, 1 row affected (0.000 sec)

MariaDB [(none)]> grant all privileges on grepit_zabbix.* to user_zabbix@localhost identified by 'zabbix123';
Query OK, 0 rows affected (0.000 sec)

MariaDB [(none)]> Bye
[root@zabbix ~]#
Then Import initial data:
You will be prompted to enter the database user password. In the sample output provided above, I have set the password as “zabbix123”.
zcat /usr/share/doc/zabbix-server-mysql*/create.sql.gz | mysql -uuser_zabbix -p grepit_zabbix
Configure the Database
Edit the Zabbix configuration files with your favorite editor. I am using the VIM editor here.
vim /etc/zabbix/zabbix_server.conf
Then modify the following parameters with the database name, database user and the password you have created. I am adding my details here:
DBName=grepit_zabbix
DBUser=user_zabbix
DBPassword=zabbix123
Add the preferred Time Zone
vim /etc/php-fpm.d/zabbix.conf
I am adding the Indian time zone here. You can find the desired timezones by going List of Supported Timezones.
php_value[date.timezone] = Asia/Kolkata
Start Zabbix Server and Agent
systemctl enable zabbix-server zabbix-agent httpd php-fpm
systemctl restart zabbix-server zabbix-agent httpd php-fpm
Zabbix Frontend Configuration
Login to the Zabbix frontend using any one of the following URLs.
http://Server_IP_Address/zabbix
http://Server_Hostname/zabbix
The default username of newly installed Zabbix server is “Admin” and the password is “zabbix”. You can change it later.
Welcome Page
Once to call the Zabbix frontend URL on your browser for the first time, it will lead you to an installation wizard.
The first screen should be like this:

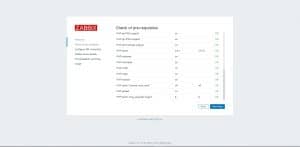
Pre-requisite Check
You will get a warning message in this page if the Software and PHP configuration is not met. You need to edit the PHP configuration file (commonly /etc/php.ini) if you got any errors.
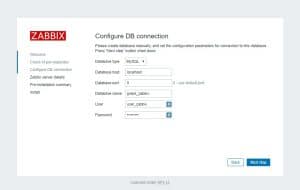
Database Configuration
You need to enter the database name, database username and it’s password in this page.
Zabbix Server Details
Enter zabbix server details here.

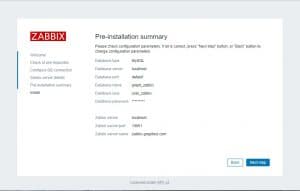
Summary
Review the summary of the provided details.
Complete the Installation
Finisht the installation in this page by clicking the “Finish” button.
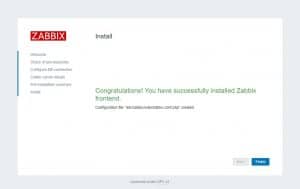
That’s it!
Also Read:
- How to Install BleachBit on Ubuntu and Derivatives
- How to Install Klavaro Typing Tutor on Ubuntu
- How to Install ClassicMenu Indicator on Ubuntu
- Install OpenSCAD in Ubuntu, Debian, Fedora and Arch Linux
- How to Install DraftSight on Ubuntu and Derivatives
- Install Aptik on Ubuntu and manage your PPA’s!
- How to roll back an update in CentOS or RedHat
- Install and enable sudo command in Debian
- How to Install Kodi on Ubuntu and its Derivatives
- cPanel & WHM Servers integrates ImunifyAV on Versions 82 or 84
- Unknown storage engine InnoDB when using LOCK TABLES
- How to install gallery-dl in Ubuntu
- Install youtube-dl in Ubuntu
- How to Install Python 3 in cPanel Server
- How to Install Kdenlive Video Editor on Ubuntu
If you like the post Understanding top Command and wish to receive more articles from us, please like our FB page: GrepItOut
Your suggestions and feedbacks will encourage us and help to improve further, please feel free to write your comments. For more details on our services, please drop us an E-mail at [email protected]
Add Comment