


Install OpenVPN Client on Ubuntu
In my previous post, I have explained how to install OpenVPN server on CentOS. This post describes how to install OpenVPN Client on Ubuntu (OpenVPN Network Manager). Also, we can simply configure the OpenVPN client using the network manager.
Run the following command to install the Network Manager Plugin for OpenVPN.
sudo apt install install network-manager-openvpn network-manager-openvpn-gnome
Once it is installed, restart network manager.
/etc/init.d/network-manager restart
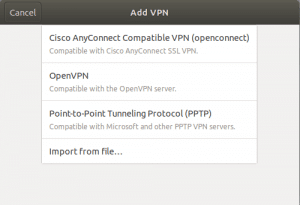
Import an OpenVPN configuration file (.ovpn file) with Network Manager
If you have the .ovpn file, you can simply import it with Network Manager. Please note that you can download the .ovpn file from Client UI [Click on “Yourself (user-locked profile)“]

Once the file is downloaded, Open “Gnome Settings” and select “Network“. You can find a VPN section and click on the plus (+) symbol.

You will get an “Add VPN” window. Click on the “Import from file…” option and add your .ovpn file.
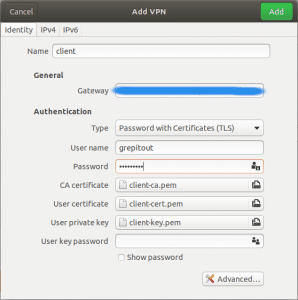
Provide the Username and Password and click on the Add button:
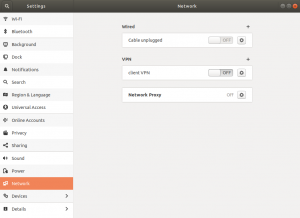
Finally, click on/off button to turn on the VPN:
That’s it!
If you like this post and wish to receive more articles from us, please like our FB page: GrepItOut
Your suggestions and feedbacks will encourage us and help to improve further, please feel free to write your comments.
For more details on our services, please drop us an E-mail at [email protected]


Add Comment