


How to Install OpenVPN on CentOS and Derivatives
This post helps you to install OpenVPN on CentOS. On the long road leading to the protection of privacy on the Internet, we hear more about virtual private networks (VPN). This technique allows the creation of an encrypted link between your machine and a server hosted on the Internet. All your access to the Internet will then be seen from the IP address of this VPN server and no longer by that of your machine.
We are going to see how to install and configure your own VPN server on CentOS.
OpenVPN Server Installation
First, obtain the correct installation package from here according to the OS version and architecture. Then follow the below steps to install OpenVPN on CentOS. I am installing OpenVPN on CentOS 7 here.
If you are going to install OpenVPN server on OpenVZ virtual machine, you need to Enable TUN/TAP on the VPS. Also, make sure that ifconfig is installed on your server. If it is not installed, run the following command.
yum install net-tools -y
Then proceed with the OpenVPN installation.
cd /usr/local/src/
wget http://swupdate.openvpn.org/as/openvpn-as-2.5.2-CentOS7.x86_64.rpm
rpm -ivh openvpn-as-2.5.2-CentOS7.x86_64.rpm
Once the installation complete, run the following command to configure the VPN manually.
/usr/local/openvpn_as/bin/ovpn-init
Check the sample output below. Please note that I haven’t added the End User License Agreement in the below snippet.
Please enter 'yes' to indicate your agreement [no]: yes

Once you provide a few initial configuration settings,
OpenVPN Access Server can be configured by accessing
its Admin Web UI using your Web browser.

Will this be the primary Access Server node?
(enter 'no' to configure as a backup or standby node)
> Press ENTER for default [yes]: yes

Please specify the network interface and IP address to be
used by the Admin Web UI:
(1) all interfaces: 0.0.0.0
(2) venet0: 10.0.0.11
(3) venet0:0: 10.0.0.11
Please enter the option number from the list above (1-3).
> Press Enter for default [2]: 2

Please specify the port number for the Admin Web UI.
> Press ENTER for default [943]: 943

Please specify the TCP port number for the OpenVPN Daemon
> Press ENTER for default [443]: 443

Should client traffic be routed by default through the VPN?
> Press ENTER for default [yes]: yes

Should client DNS traffic be routed by default through the VPN?
> Press ENTER for default [yes]: yes

Use local authentication via internal DB?
> Press ENTER for default [yes]: yes

Should private subnets be accessible to clients by default?
> Press ENTER for default [yes]: yes

To initially login to the Admin Web UI, you must use a
username and password that successfully authenticates you
with the host UNIX system (you can later modify the settings
so that RADIUS or LDAP is used for authentication instead).

You can login to the Admin Web UI as "openvpn" or specify
a different user account to use for this purpose.

Do you wish to login to the Admin UI as "openvpn"?
> Press ENTER for default [yes]: yes

> Please specify your OpenVPN-AS license key (or leave blank to specify later):


Initializing OpenVPN...
Adding new user login...
useradd -s /sbin/nologin "openvpn"
Writing as configuration file...
Perform sa init...
Wiping any previous userdb...
Creating default profile...
Modifying default profile...
Adding new user to userdb...
Modifying new user as superuser in userdb...
Getting hostname...
Hostname: anything.domain.com
Preparing web certificates...
Getting web user account...
Adding web group account...
Adding web group...
Adjusting license directory ownership...
Initializing confdb...
Generating init scripts...
Generating PAM config...
Generating init scripts auto command...
Starting openvpnas...

NOTE: Your system clock must be correct for OpenVPN Access Server
to perform correctly. Please ensure that your time and date
are correct on this system.

Initial Configuration Complete!

You can now continue configuring OpenVPN Access Server by
directing your Web browser to this URL:

https://10.0.0.11:943/admin
Login as "openvpn" with the same password used to authenticate
to this UNIX host.

During normal operation, OpenVPN AS can be accessed via these URLs:
Admin UI: https://10.0.0.11:943/admin
Client UI: https://10.0.0.11:943/

See the Release Notes for this release at:
http://www.openvpn.net/access-server/rn/openvpn_as_2_5_2.html
The default admin user is “openvpn”. You can change its password using the following command.
passwd openvpn
The admin and client login URL is:
Admin UI: https://10.0.0.11:943/admin
Client UI: https://10.0.0.11:943/
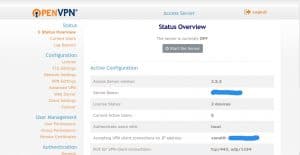
You need to start the server once you log into the admin panel.
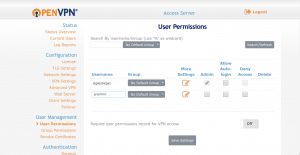
Also, you can add admin/client users from “User Permissions” option available in the admin panel. Please make sure that to click on the “More Settings” symbol and set the password for the new user.
That’s it!
If you like this post and wish to receive more articles from us, please like our FB page: GrepItOut
Your suggestions and feedbacks will encourage us and help to improve further, please feel free to write your comments.
For more details on our services, please drop us an E-mail at [email protected]


Add Comment