


Install Icinga 2 on CentOS 7
This blog will help you to install Icinga 2 on CentOS 7 and its derivatives. First, you need to install repositories for Icinga and epel.
yum install https://packages.icinga.com/epel/icinga-rpm-release-7-latest.noarch.rpm -y
yum install epel-release -y
yum install git curl make gcc wget nano vim net-tools tar unzip zip python-devel python-pip python-setuptools -y
Install icinga2
Once you installed the necessary repositories, go ahead and install Icinga2 package using the following commands:
yum install icinga2 -y
Enable and start the service:
systemctl enable --now icinga2
systemctl status icinga2
We can list the enabled and disabled features with this command.
icinga2 feature list
Install Monitoring Plugins
Now you need to install the standard monitoring plugins. These plugins allow you to run remote checks to remote systems.
yum install nagios-plugins-all
Install check_nrpe Plugin
If you are planning to use NRPE agent on your host that needs to be monitored, install check_nrpe plugin too
yum install nagios-plugins-nrpe
Install MariaDB server
yum install mariadb-server mariadb
Enable and start MySQL Service:
systemctl enable --now mariadb
systemctl status mariadb
Secure MariaDB
Run the following command to secure MariaDB.
mysql_secure_installation
Sample output:
[root@icinga ~]# mysql_secure_installation

NOTE: RUNNING ALL PARTS OF THIS SCRIPT IS RECOMMENDED FOR ALL MariaDB
SERVERS IN PRODUCTION USE! PLEASE READ EACH STEP CAREFULLY!

In order to log into MariaDB to secure it, we'll need the current
password for the root user. If you've just installed MariaDB, and
you haven't set the root password yet, the password will be blank,
so you should just press enter here.

Enter current password for root (enter for none):
OK, successfully used password, moving on...

Setting the root password ensures that nobody can log into the MariaDB
root user without the proper authorisation.

Set root password? [Y/n] y
New password:
Re-enter new password:
Password updated successfully!
Reloading privilege tables..
... Success!


By default, a MariaDB installation has an anonymous user, allowing anyone
to log into MariaDB without having to have a user account created for
them. This is intended only for testing, and to make the installation
go a bit smoother. You should remove them before moving into a
production environment.

Remove anonymous users? [Y/n] y
... Success!

Normally, root should only be allowed to connect from 'localhost'. This
ensures that someone cannot guess at the root password from the network.

Disallow root login remotely? [Y/n] y
... Success!

By default, MariaDB comes with a database named 'test' that anyone can
access. This is also intended only for testing, and should be removed
before moving into a production environment.

Remove test database and access to it? [Y/n] y
- Dropping test database...
... Success!
- Removing privileges on test database...
... Success!

Reloading the privilege tables will ensure that all changes made so far
will take effect immediately.

Reload privilege tables now? [Y/n] y
... Success!

Cleaning up...

All done! If you've completed all of the above steps, your MariaDB
installation should now be secure.

Thanks for using MariaDB!
[root@icinga ~]#
Install Icinga2 IDO Module
The DB IDO (Database Icinga Data Output) exports all configuration and status information into a database. icinga2-ido-mysql module allows us to setup remote monitoring base reporting of the Icinga platform.
yum install icinga2-ido-mysql
Setting up the MySQL database for Icinga2
Login to MariaDB shell using the following command:
mysql -u root -p
and run the following commands on it:
CREATE DATABASE icinga_db;
GRANT SELECT, INSERT, UPDATE, DELETE, DROP, CREATE VIEW, INDEX, EXECUTE ON icinga_db.* TO 'icinga_user'@'localhost' IDENTIFIED BY 'icinga123';
FLUSH PRIVILEGES;
QUIT
Sample Output:
MariaDB [(none)]> CREATE DATABASE icinga_db;
Query OK, 1 row affected (0.00 sec)

MariaDB [(none)]> GRANT SELECT, INSERT, UPDATE, DELETE, DROP, CREATE VIEW, INDEX, EXECUTE ON icinga_db.* TO 'icinga_user'@'localhost' IDENTIFIED BY 'icinga123';
Query OK, 0 rows affected (0.00 sec)

MariaDB [(none)]> FLUSH PRIVILEGES;
Query OK, 0 rows affected (0.00 sec)

MariaDB [(none)]> quit
Bye
Import Icinga 2 IDO schema
After creating the database you can import the Icinga 2 IDO schema using the following command.
mysql -u root -p icinga_db < /usr/share/icinga2-ido-mysql/schema/mysql.sql
Enable IDO MySQL module
Enable ido-mysql and command feature using icinga2 command:
icinga2 feature enable ido-mysql
icinga2 feature enable command
Now edit ido-mysql.conf
vim /etc/icinga2/features-enabled/ido-mysql.conf
Add the following contents to it:
/**
* The IdoMysqlConnection type implements MySQL support
* for DB IDO.
*/

object IdoMysqlConnection "ido-mysql" {
user = "icinga_user"
password = "icinga123"
host = "localhost"
database = "icinga_db"
}
Configure Icinga 2 REST ApiUser
Run the following command
icinga2 api setup
and edit:
vim /etc/icinga2/conf.d/api-users.conf
Add the following contents into it:
/**
* The ApiUser objects are used for authentication against the API.
*/
object ApiUser "icingaweb2" {
password = "password123"
// client_cn = ""

// Giving full permission for the apiuser.

permissions = [ "*" ]
}
Restart Icinga2 service:
systemctl restart icinga2
Install Icinga Web 2
Icinga Web 2 is a powerful PHP framework for web applications that comes in a clean and reduced design. It’s fast, responsive, accessible and easily extensible with modules. To install Icinga Web 2, you need to enable the SCL repository, so that the dependencies can pull in the newer PHP.
Enable SCL repository
yum install centos-release-scl -y
Install Icinga Web 2
yum install icingaweb2 icingacli -y
Install webserver
yum install httpd -y
Enable and start httpd
systemctl enable --now httpd
systemctl status httpd
Add firewall rules:
For webserver
firewall-cmd --add-service=http
firewall-cmd --permanent --add-service=http
For Icinga API
By default, Icinga listens on port 5665
firewall-cmd --zone=public --permanent --add-port=5665/tcp
For Email Notification
If you wish to enable Email Notification enable the following rules
firewall-cmd --permanent --add-service=smtp
firewall-cmd --permanent --add-service=smtps
firewall-cmd --permanent --add-port=25/tcp
Reload Firewall
firewall-cmd --reload
Setting up FPM
systemctl enable --now rh-php73-php-fpm.service
systemctl status rh-php73-php-fpm.service
Install imagick module
Imagick allows you to generate pdf reports. We need to restart Apache and PHP after the installation of imagick.
yum --enablerepo=centos-sclo-sclo-testing install sclo-php73-php-pecl-imagick -y
systemctl restart httpd
systemctl restart rh-php73-php-fpm.service
Web Setup
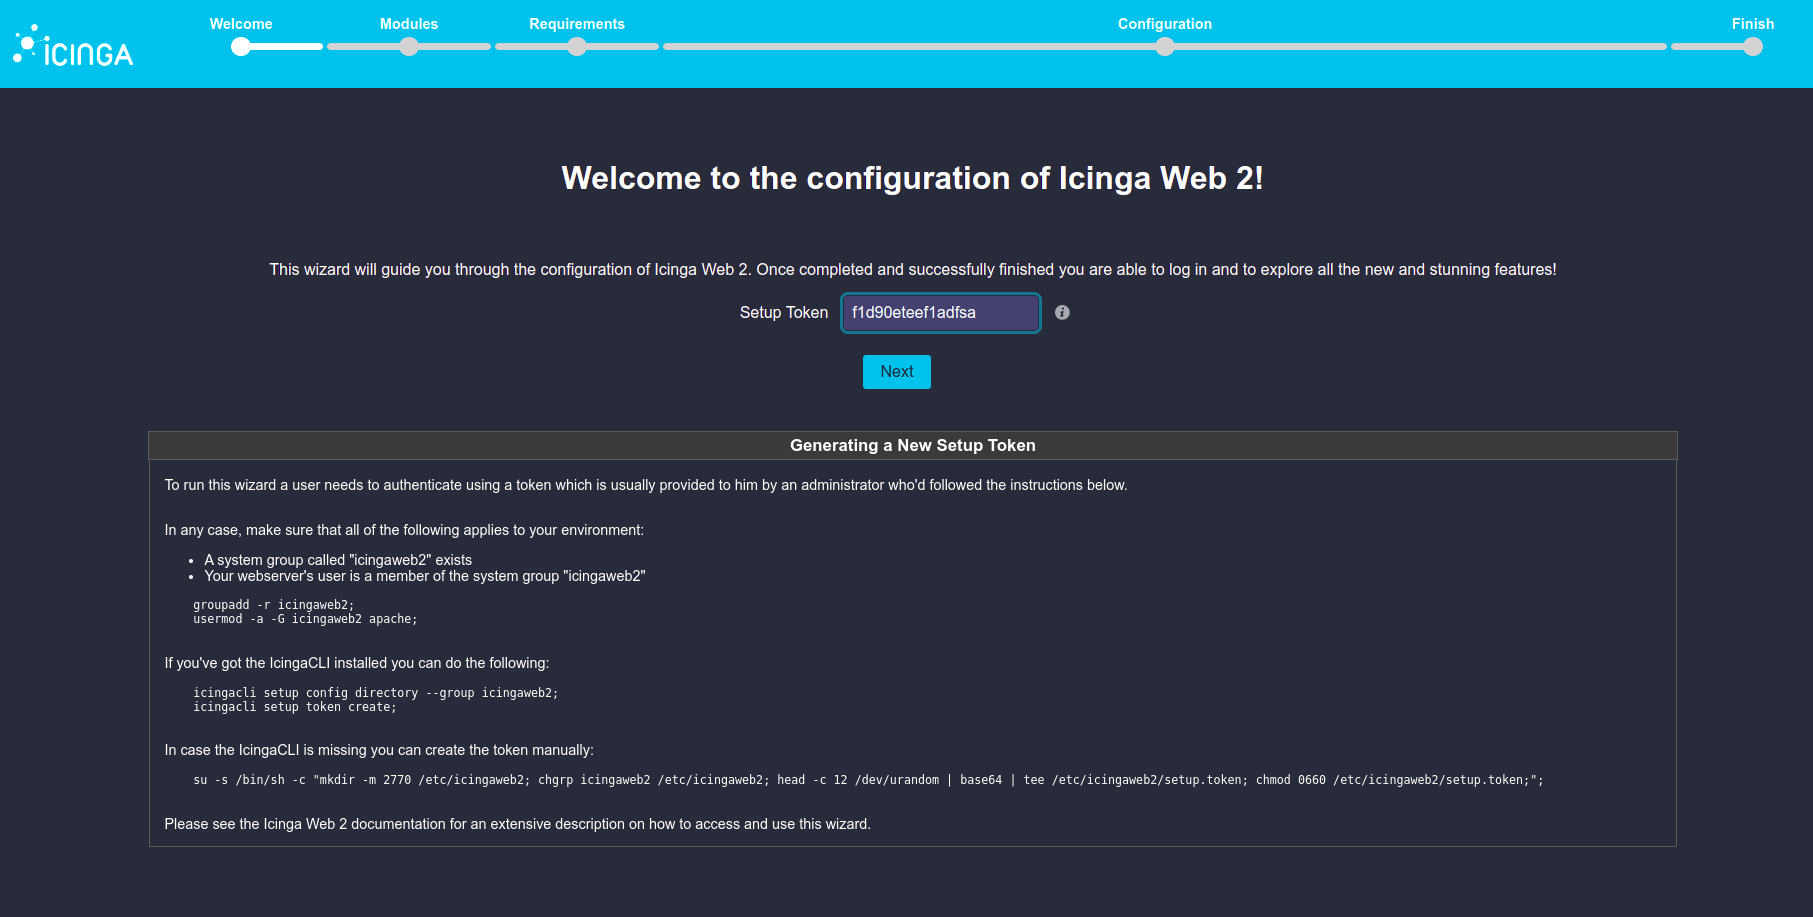
To setup Icinga Web 2, we first need to generate a token.
Generate Token
Run the following command to generate the token
icingacli setup token create
Sample output
[root@icinga ~]# icingacli setup token create
The newly generated setup token is: f1d90eteef1adfsa
[root@icinga ~]#
In case you do not remember the token, you can show it using the icingacli:
icingacli setup token show
Then take the following URL to complete the setup: http://<icinga-server-IP-Address>/icingaweb2
The first page will ask you for the generated token
Provide the token in there and click Next.
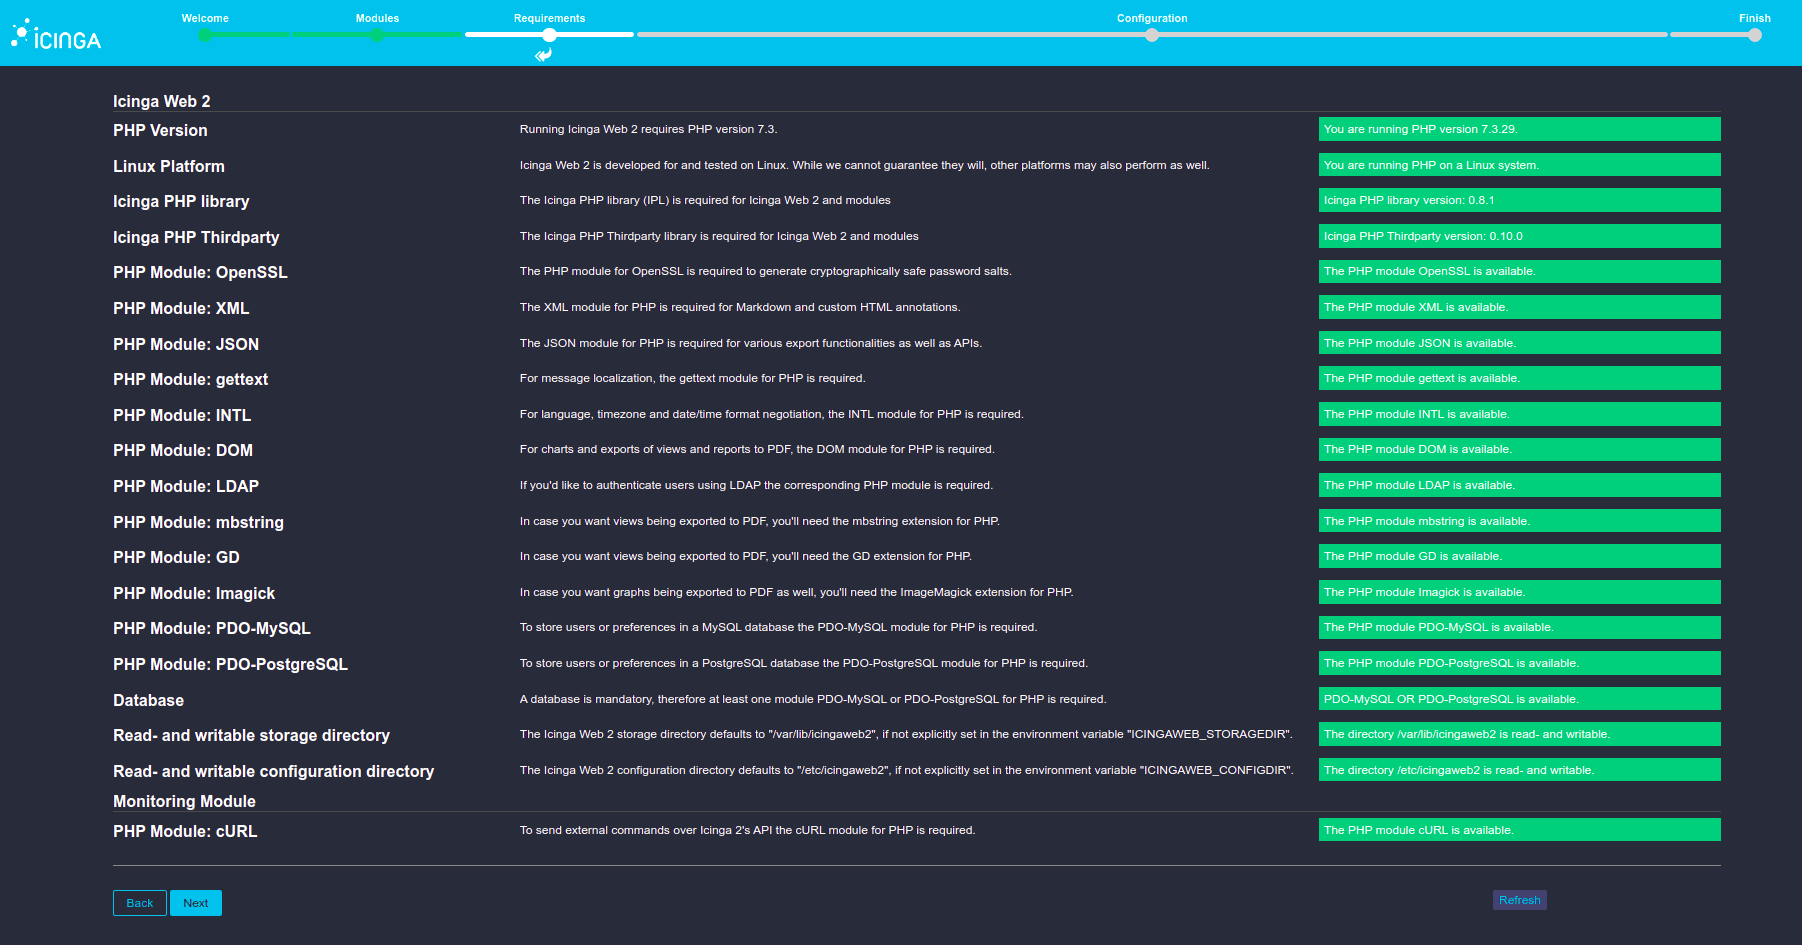
Enable desired Modules

PHP Module Dependencies
Verify all PHP modules are green. If anything is found not installed, go to the terminal and install it
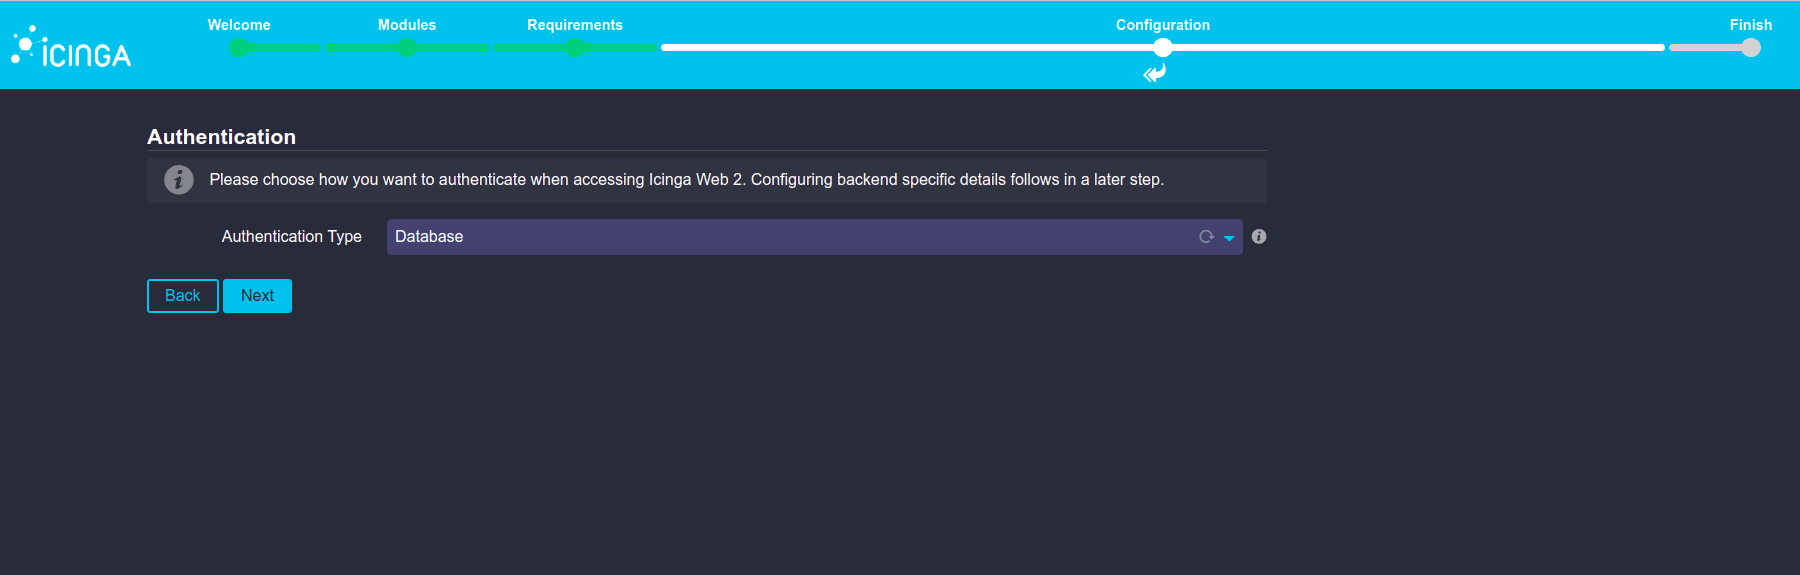
Authentication
Use database authentication by default.
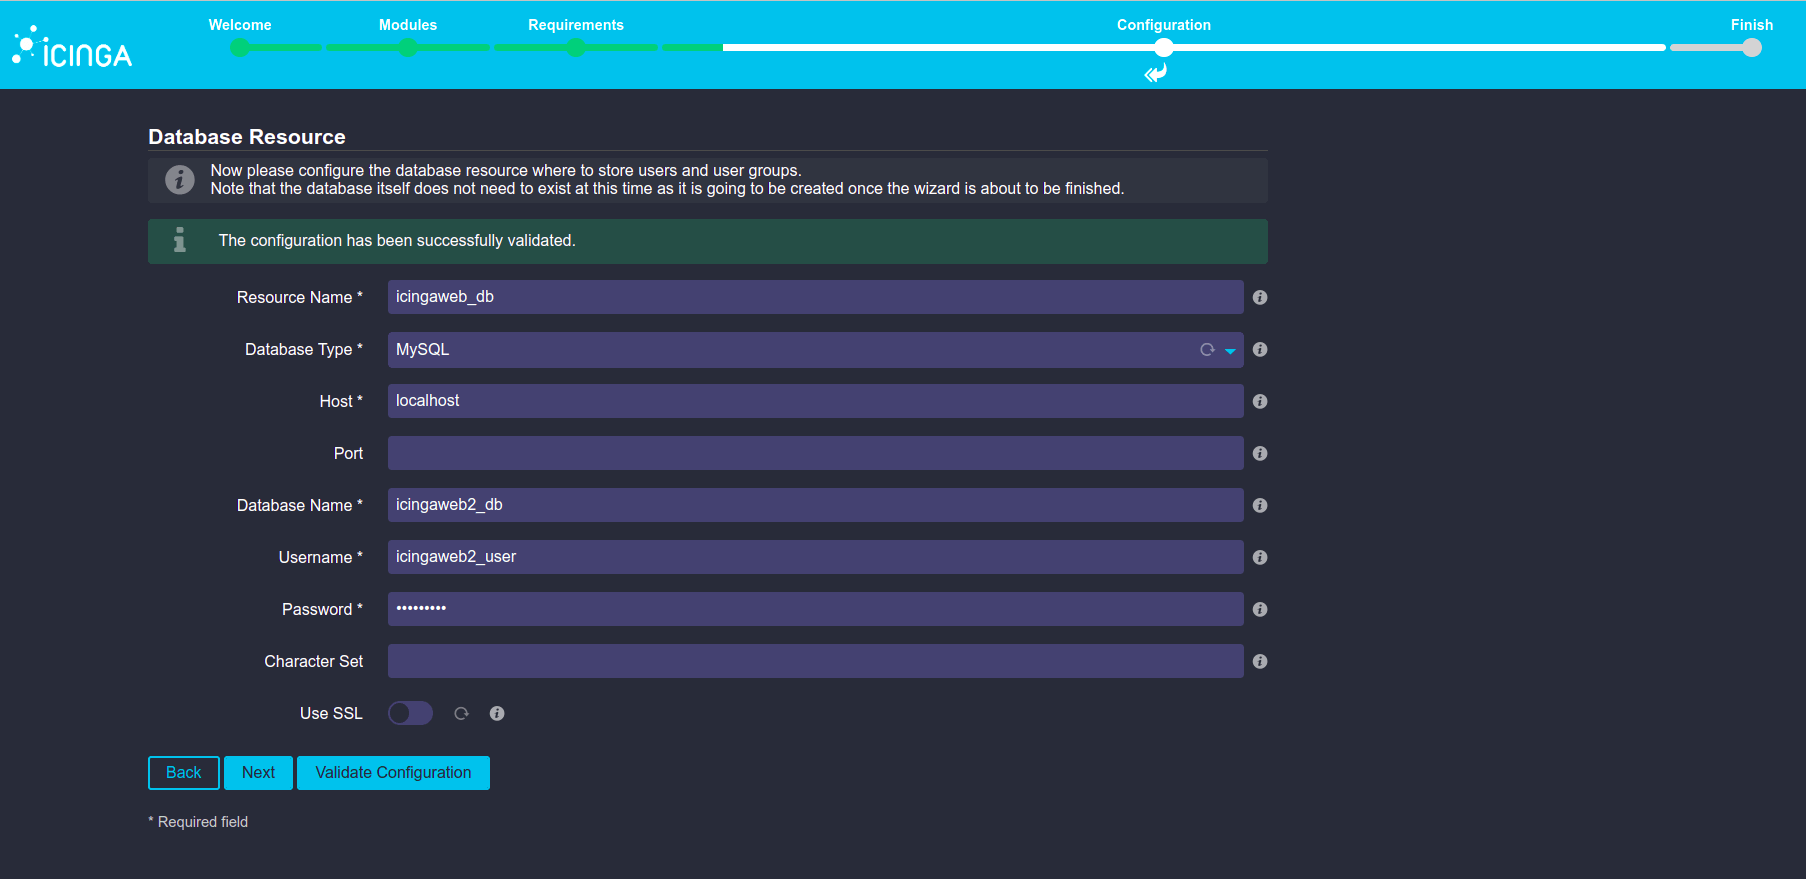
Database Resource
Setup a database and database user for icingaweb2. We don’t need to create this database and user via backend. It will be automatically created once this setup is completed.
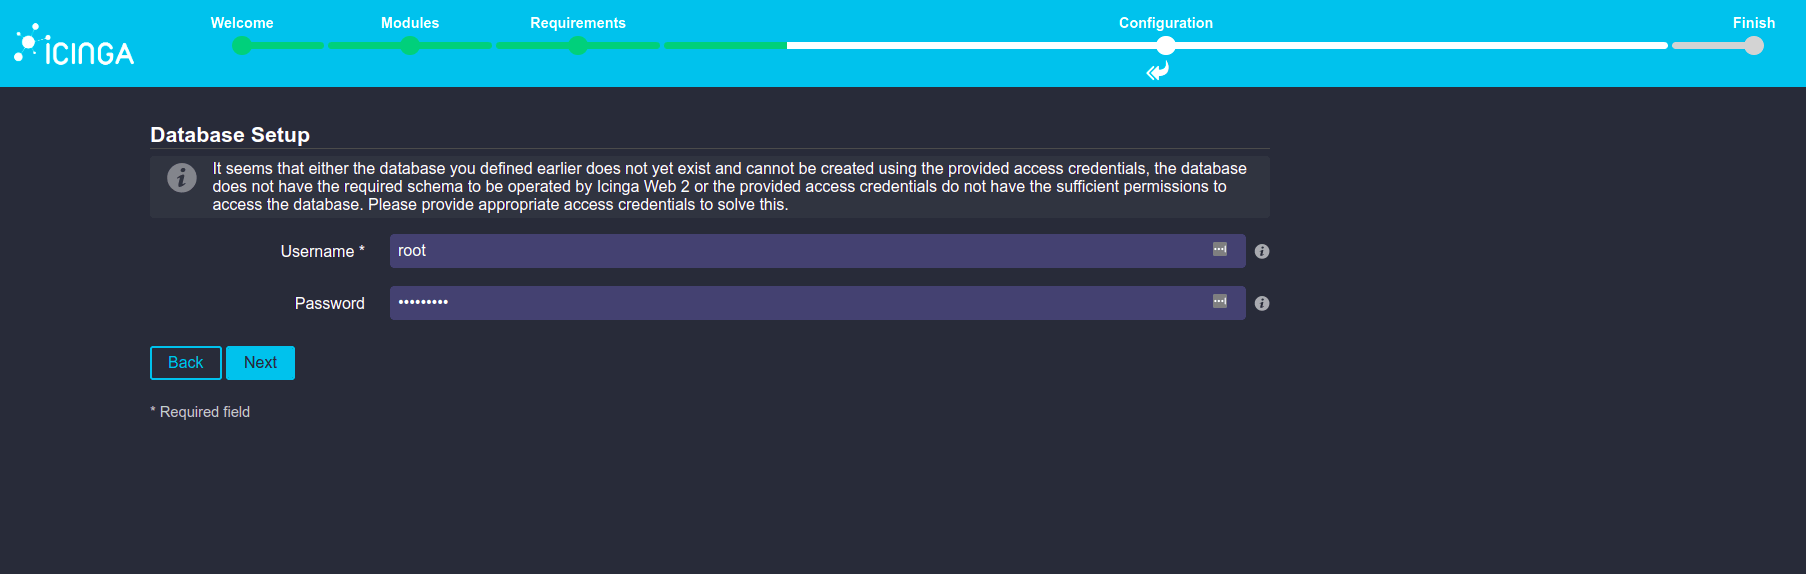
Database Setup
To create the database and its user we have provided in the previous window, we have to provide the MySQL root user and password here.
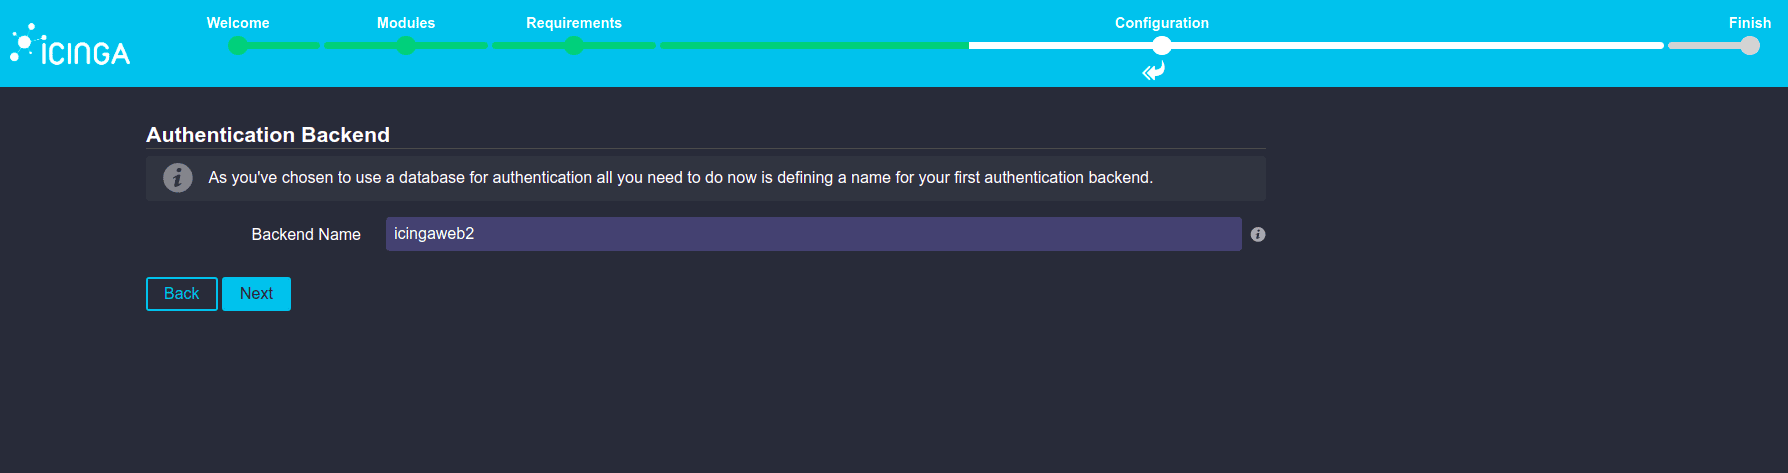
Authentication Backend
Now define a name for authentication
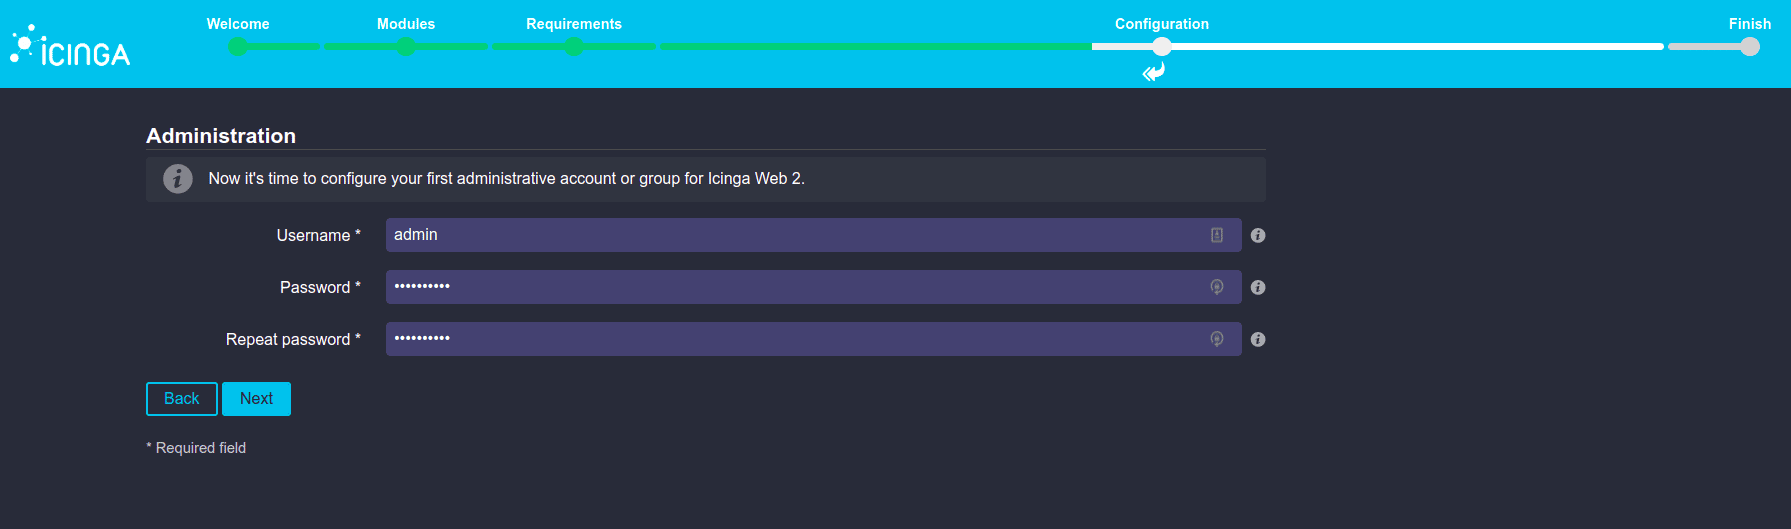
Setup Icinga Amin Panel Username and Password
Application Configuration
You can adjust the application configuration as per your need
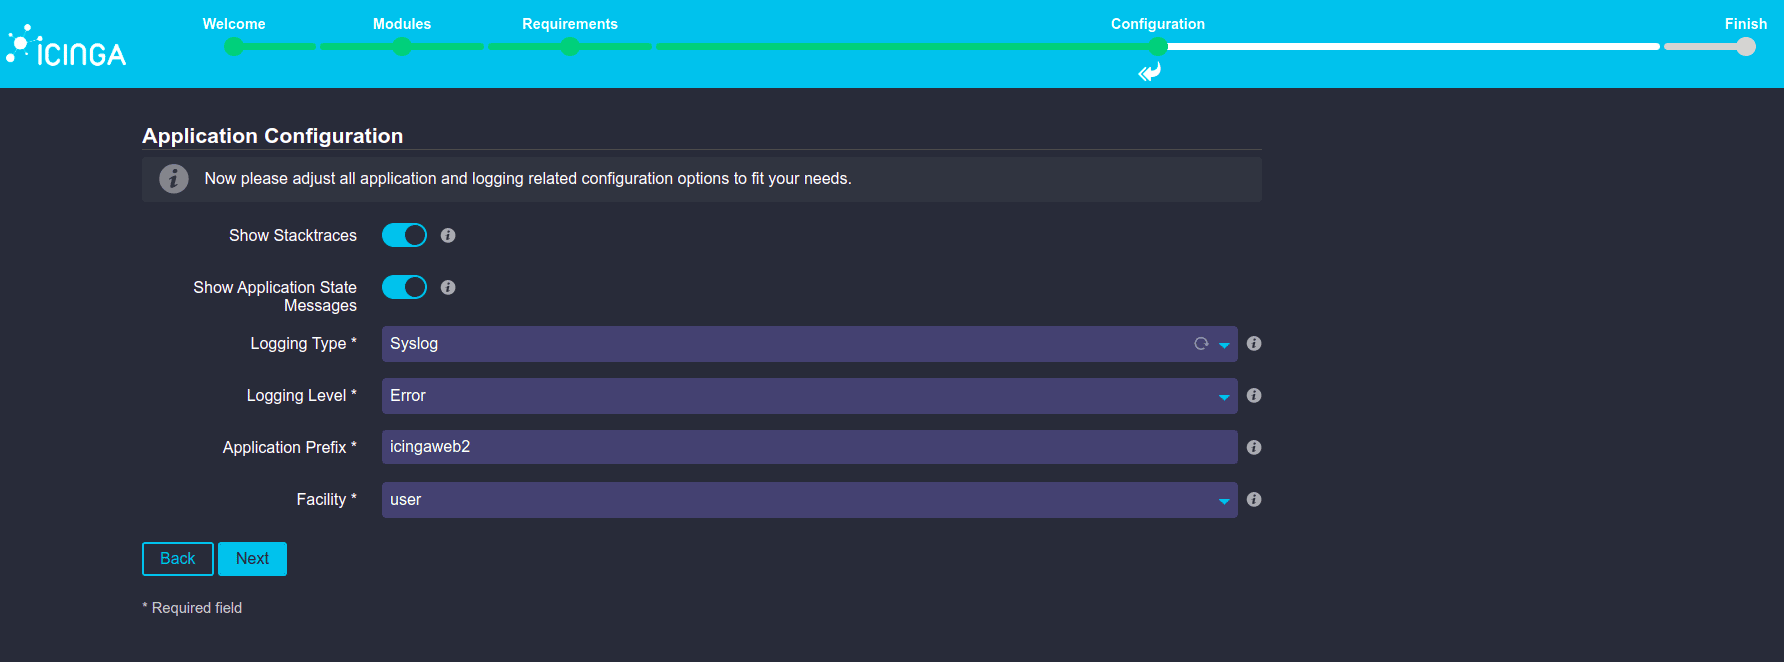
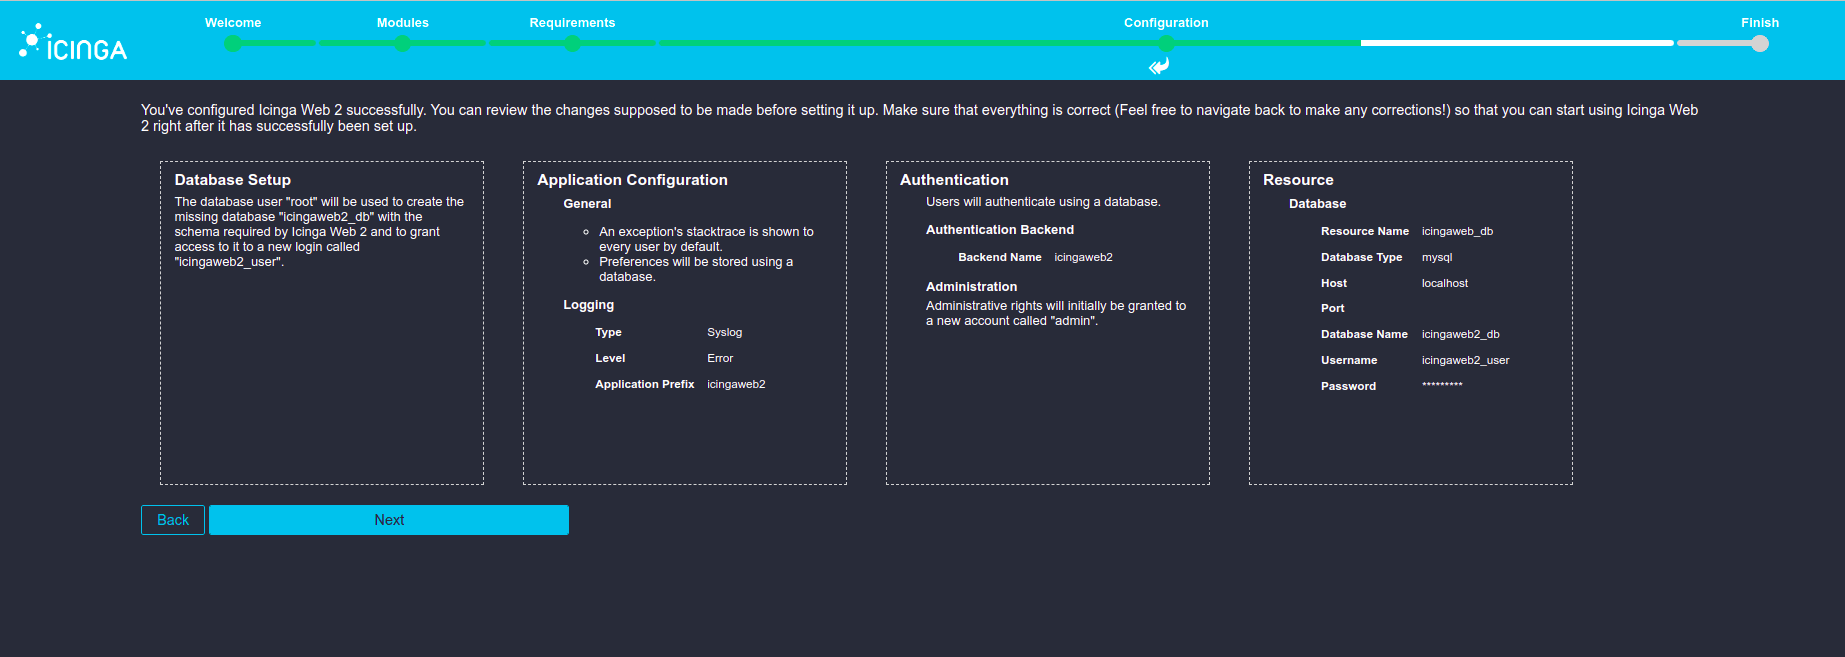
Verify the configuration
Verify the configuration and click Next
Configure Monitoring Module for Icinga Web 2
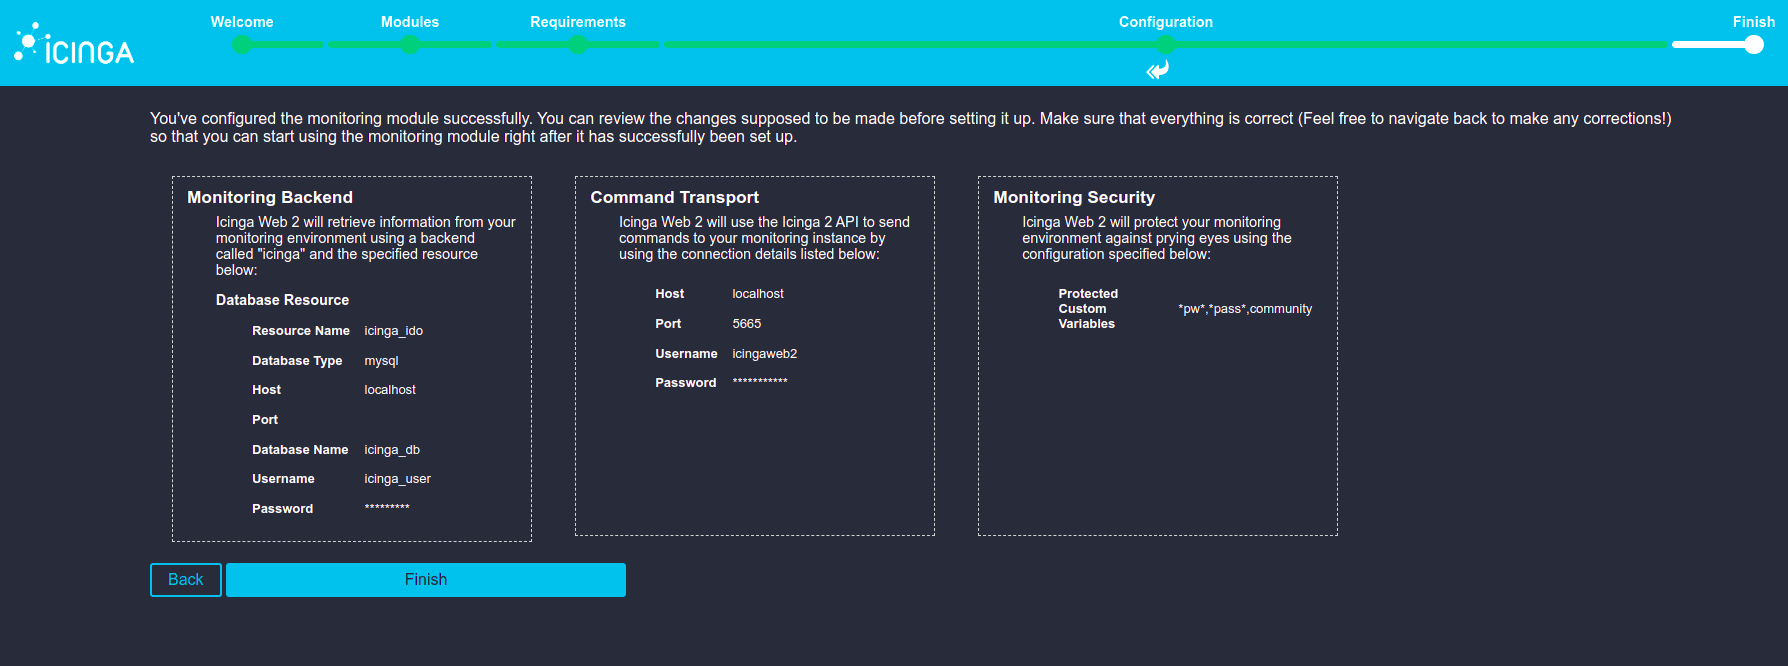
In this window, provide the database name and username that we created via backend in the step Setting up the MySQL database for Icinga2 and click Validate Configuration and Next.

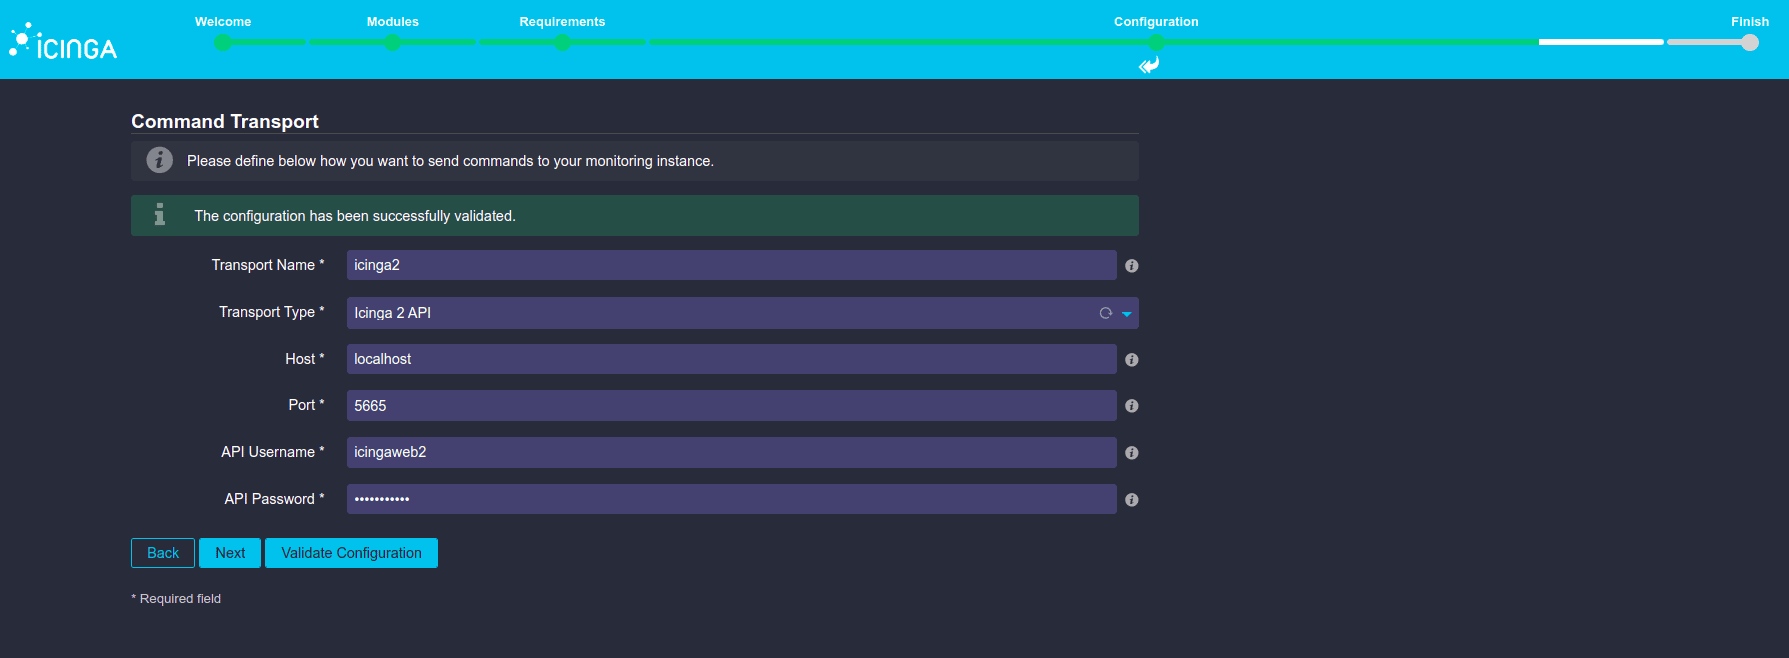
Command Transport
In this section, provide the API username and password that we created in the step Configure Icinga 2 REST ApiUser
Monitoring Security
If you would like to give any secrets like password, API token, etc, in the check command, you can give them here like a variable. The use case is, that if we have given a password in the check command, only admins can see that password when the user clicks on Inspect button.

Verify Monitoring Module Configuration
Finish the setup and Login to Icinga Web 2
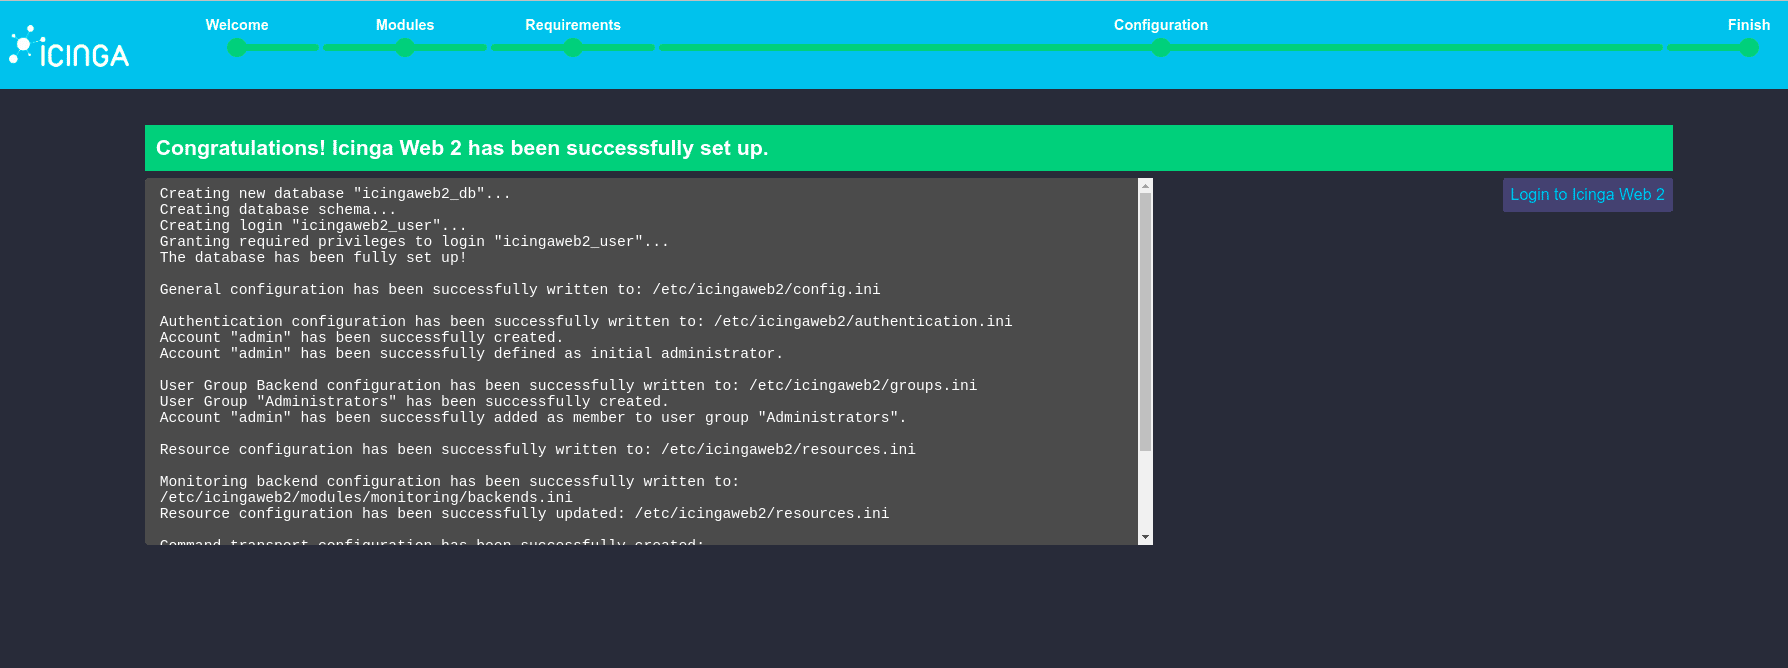
Now login to Icinga Admin Panel using the credential that we have created in the step Setup Icinga Amin Panel Username and Password
That’s it!
Also Read:
If you like this post and wish to receive more articles from us, please like our FB page: Grepitout
Your suggestions and feedback will encourage us and help us to improve further, please feel free to write your comments.
For more details on our services, please drop us an e-mail at [email protected]
Add Comment